Narrow Band Emergency Messaging System
Installation and Setup Guide
The first
thing to do is to install the NBEMS programs.
You can find a link to them on the SHARP web site. First go to www.sacsharp.org and click the
Member’s Area link at the bottom of the first page. Then enter the SHARP member username and
password. You’ll then get the basic home
screen for members. Click the NBEMS link
on the menu to get to the NBEMS page.
To get to the
NBEMS download page, click the link shown below on SHARP’s NBEMS page.

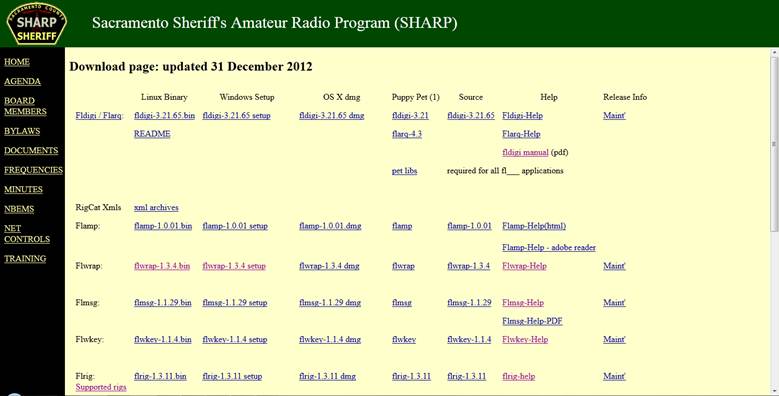
After you click the link shown above, you’ll get the web page
shown below. Locate your operating
system (Linux, Windows, OS X) and then go down the column and download the
programs you need.

Locate your operating system at the top and then the
files for the programs (shown in red).
The blue circles show the choices for a computer with MS Windows. Use the appropriate files for your
computer’s operating system.
|
|


Installing
these programs on your computer is just like installing any other program
you’ve downloaded for installation.
Download and install the correct version of Fldigi
/ Flarq, Flwarp and Flmsg for your computer’s operating system.
Once fldigi
is installed, we need to set it up!
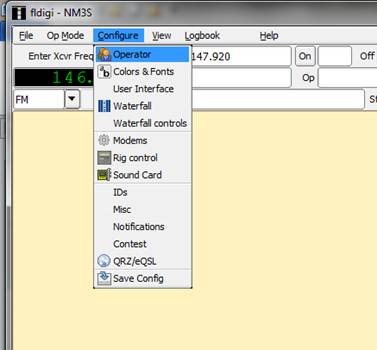
First thing to do is configure the operator settings. Select “Configure” and then “Operator.” I
suggest you use this technique to get into configuring anything in fldigi, because
it’s really the simplest way to get to the configuration settings.
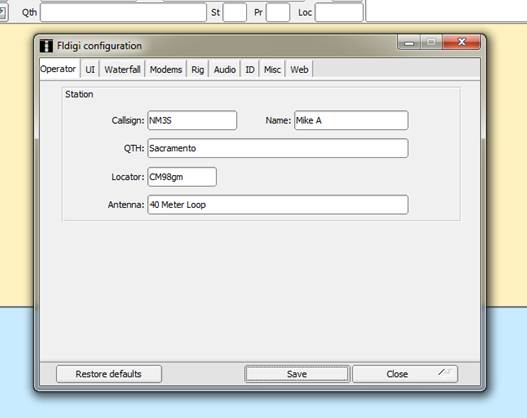
Configure your operator information.
Fill in the boxes with your information.
Don’t know your
“Locator” (aka Maidenhead Grid Square)?
You can leave it blank for now or find it here. Fill in the boxes and BE SURE TO CLICK
“Save” when you’re done.


Be sure to click the “Save” button after you fill in the
information.
|
|
Next, click
MODEMS, then click MT-63 and UNCHECK the “Allow manual tuning” box. This avoids tuning errors on MT-63. As always, when you change a configuration
page, click the “Save” button!

Step 3, Uncheck this box if it is checked.
|
|

Step 2, click the “MT-63” tab.
|
|

Step 1, click the “Modems” tab.
|
|


Step 4, Always click “Save” after you make a change.
|
|


Next,
configure the input. THIS IS CRITICAL SO
BE CAREFUL!
To get started, first, if you are
going to be using any kind of cable or hardware interface, CONNECT THE CABLES
up to everything and turn it all on.
This is necessary so the computer can “see” any device you are using.
(Of course, you do NOT have to have any
hardware interface between your radio and computer at all, but it is easier if
you have one. I suggest you at least
hook a patch cable between the radio’s external speaker jack and the computer’s
line in or microphone jack, although, again, it is NOT absolutely
required.)
Once you’ve
got everything hooked up, click the Audio tab, and then click the Devices
tab. We will be setting the devices to
be used for “Capture” (which is the audio from the radio to the computer) and
for “Playback” (which is the audio from the computer to the radio). Which set of choices below will you want to
use? It depends on the hookup between
your radio and computer. There are three
different kinds of hookups covered here:
1)
Rigblaster
interface OR single patch cord between radio’s external speaker jack to
computer microphone or line in jack (you will hold the radio’s mic by the computer’s speaker for transmit).
2)
No
wires at all between computer and radio
3)
SignaLink
interface
The exact
choices that will show up on YOUR computer for “Capture:” and “Playback:” may
differ from those shown below. However,
you should see options SIMILAR to those shown.
You may need to experiment a little to find the option that works for
you.
Also,
please note that, whatever your setup, the PortAudio
box MUST always be checked!
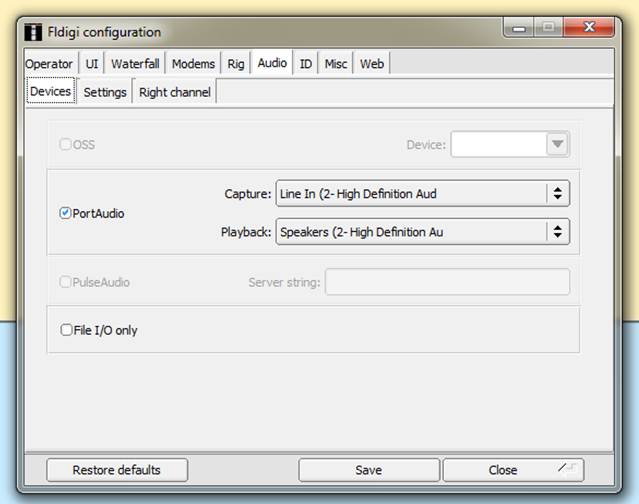
Option 1, Rigblaster
OR using a single wire between the radio and computer for the radio’s audio. The setup shown directly below should work
for you. “Capture” should be Line In
and “Playback” should be Speakers.
Step 3, Make sure “PortAudio”
is checked
|
|


Step 2, Click the “Devices” tab
|
|


Step 6, click “Save” to save your changes
|
|


Step 5, for “Playback” select “Speakers”
|
|
Step 4, for “Capture” select “Line In”
|
|

Step 1, Click the “Audio” tab
|
|


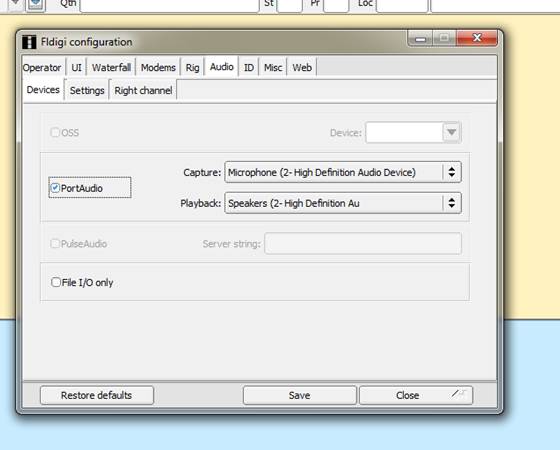
Option 2, not using any wires at all,
you would use the setup shown below.
Note that the exact language and setup of the drop down lists may vary
depending on your computer and devices attached to it. But here for “Capture”, we are selecting Microphone
as shown below.
See below for steps 5 and 6.
|
|


Step 3, make sure, PortAudio
is checked!
|
|

Step 4, select “Microphone” for “Capture”
|
|


Step 2, Click the “Devices” tab.
|
|


Step 1, Click the “Audio” tab.
|
|

For PLAYBACK
we select SPEAKERS. Below is how it
looks after you’re all done.


Step 6, click “Save” to save your changes.
|
|

Step 5, select “Speakers” for playback.
|
|

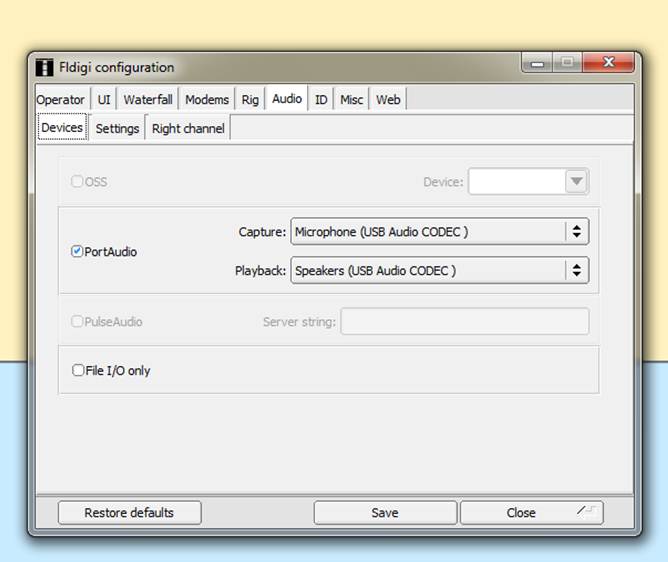
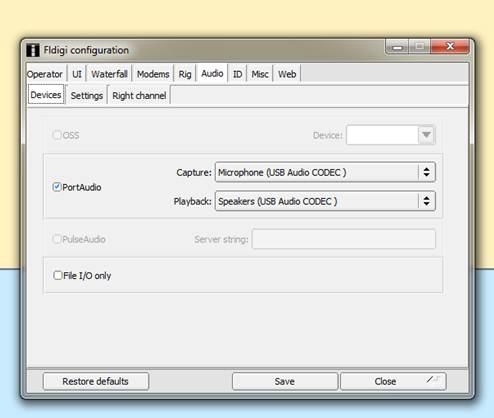
Option 3, using a SignaLink
device. You will want to select
“Microphone (USB Audio CODEC)” for Capture and “Speakers (USB Audio
CODEC)” for Playback.
Step 3, make sure PortAudio is
checked.
|
|

Step 6, click “Save” to save your changes.
|
|


Step 5, Set “Playback” to “Speakers (USB Audio CODEC)”
|
|


Step 4, Set “Capture” to “Microphone (USB Audio CODEC)”
|
|


Step 2, Click the “Devices” tab.
|
|

Step 1, Click the “Audio” tab.
|
|
Another
reminder, regardless of which option you went with above, once you’ve completed
the audio device setup, be sure to click SAVE!

Be sure to click the Save button after you finish
the settings!
|
|

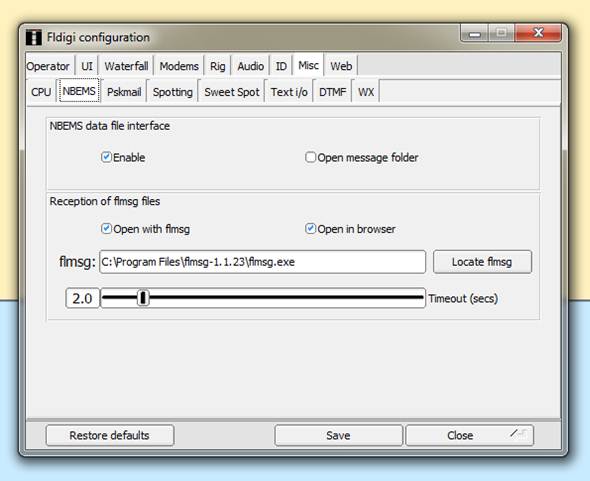
The next task
is to set up the NBEMS system to work correctly with flmsg. This is a very cool feature that allows your
computer to instantly display to you any message sent you by another ham using flmsg. We mustl tell fldigi where flmsg is installed
on the computer. Once we do that,
whenever you receive a message from another ham using flmsg,
fldigi can open your browser and/or flmsg and display the message to you.
First click
the “Misc” tab and then the NBEMS tab. Then click the “Locate flmsg”
button.


Step 3, just note on this example where MY flmsg installed.
I accepted the defaults. If
you also did that, your flmsg might be in the
same place.
|
|

Step 4, click “Locate flmsg”
|
|

Step 2, click the “NBEMS” tab.
|
|

Step 1, click the “Misc” tab.
|
|
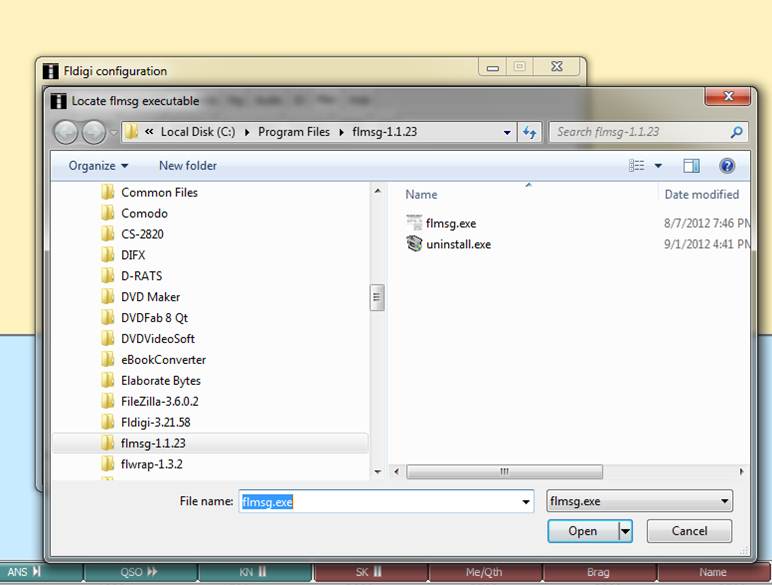
This is the screen that appears when I click
“Locate flmsg”. Yours may look
different. Note the folder “flmsg…” in
the left hand window. Once you find the
flmsg folder, click on it. Then the
right hand window will show something like what is shown below. You want to locate the program file flmsg.exe. Note that the “exe” may not appear on your
computer, depending on your settings and operating system. What I would do here is click on flmsg.exe
in the right-hand panel to show fldigi the exact location of the flmsg.exe
file. Then click the Open button.
Step 2, find the “flmsg.exe” (or maybe just “flmsg”) program file in this window and click it once.
|
|


Step 1, find the flmsg folder
in this window and click it once.
|
|


Step 3, click the “Open” button.
|
|


Now that
we’ve located flmsg, we need to tell fldigi what to
do when we receive a message. Always
click “Enable.” Then you can click
either or both “Open with flmsg” and “Open in
browser.” This controls what fldigi will
do when it receives a message from another ham using flmsg. It can open flmsg
with the fields filled in and/or open your default browser and display the
message as an html formatted document.
Personally, I suggest you click both of them, because you can always
close one of the windows if you don’t want it.
Step 2: check either or both of these (I suggest both).
|
|

Step 1: always click “Enable”
|
|


Step 3: As always, click “Save” to save your changes.
|
|


Another thing
you might want to configure is a button to type your name. This is optional, but I recommend it. Look at the buttons just above the waterfall
display. You’ll see some of them are
brown. Point at the brown button most to
the right, directly next to the blue T/R button.

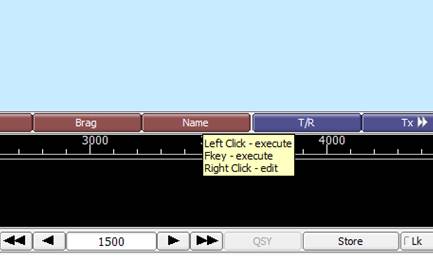
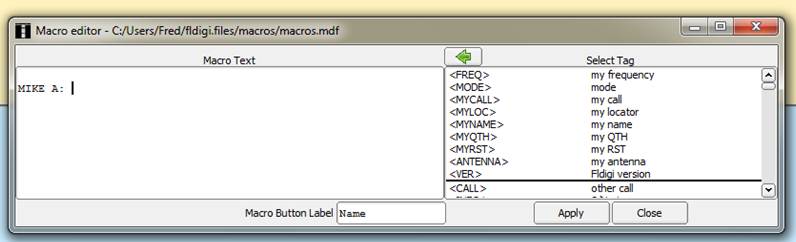
Next, right
click the button – be sure to use the RIGHT button on the mouse. You’ll see a screen like the one below. Click on the left hand window (labeled “Macro
Text”). Press the <ENTER> key to
create a blank line. Then type your
name, a colon and ONE SPACE. Then type
the word “Name” in the space that says “Macro Button Label.” Then click the “Apply” button, then the
“Close” button.


Step 4, click the “Close” button.
|
|

Step 3, click the “Apply” button.
|
|

Step 2, type the word “Name” here.
|
|

Step 1, click over here and type <ENTER> to create
a blank line, then your name, a colon and one space.
|
|
You’ve just
created a macro! These can be very
useful. The macro you made will create a
blank line (not a bad way to start a message – it will separate your message
from a previously received message on the recipient’s screen). After it creates a blank line, it will type
your name, a colon and then a blank space.
This setup makes fldigi messages look a lot like D-RATS messages, which
many of us are familiar with. We’ll use
this button later when we look at how to send a test message.
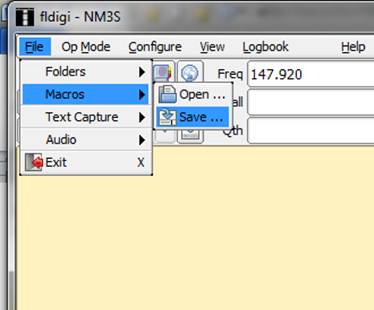
Now that
we’ve created a macro in fldigi, it would be nice if it would STAY there. However, it will not unless we perform another
step that forces fldigi to SAVE THE MACROS.
To do this, click “File”, then “Macros”, then “Save” as shown below:

That way, our
new macro will show up the next time you open fldigi. (For those interested in advanced features, you
can actually have multiple, different sets of macros and load whichever one you
like. For example, you might have a set
of macros for VHF/UHF and another set for HF, or whatever you like.)
Now, we’ve
completed all the basic configuration stuff that we only have to do once. We’re almost ready to actually SEND A
MESSGE!
There is one
last setting we want to adjust before we actually test transmission, and that
is volume on both the radio and computer.
On the radio, keep the volume high enough that you could hear it clearly
with normal voice transmission but not super loud. We’re talking 1/3 to 1/2 full volume
generally. That will provide plenty of
volume for fldigi to work with. Do NOT
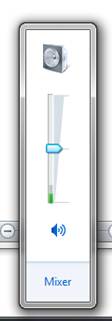
crank the volume! As to the computer
volume for the radio, start with the volume adjusted about ½ full. Mine is shown below. By the way, if you’re using a SignaLink, you should start with all three knobs at about
the 9:00 position.
Computer volume set halfway up.
|
|
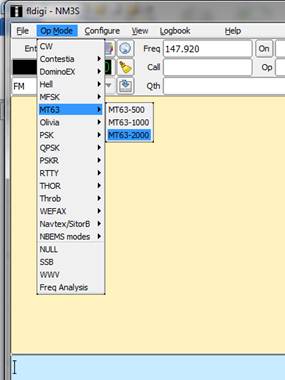
Last thing
before we transmit is to select the “op mode”, usually just called “mode”. This determines the type of encoding, or
“language”, if you prefer, that fldigi will use. For our “digital tone” net on the SHARP
repeater, we’ll mostly use the MT63 mode.
It’s very robust and especially good on FM. You’ll note there are three “flavors” of this
mode, 500, 1000 and 2000. Those are the
bandwidth used in Hz. The larger the
number, the more bandwidth used and the faster the data transmission. But there is, of course, a tradeoff, which is
if band conditions are not good, 2k won’t work.
With poor band conditions, we will have to use a narrower
bandwidth. If the band is especially
poor, we may need to use another mode, called Olivia. However, most of the time we will be using
MT63-2000.
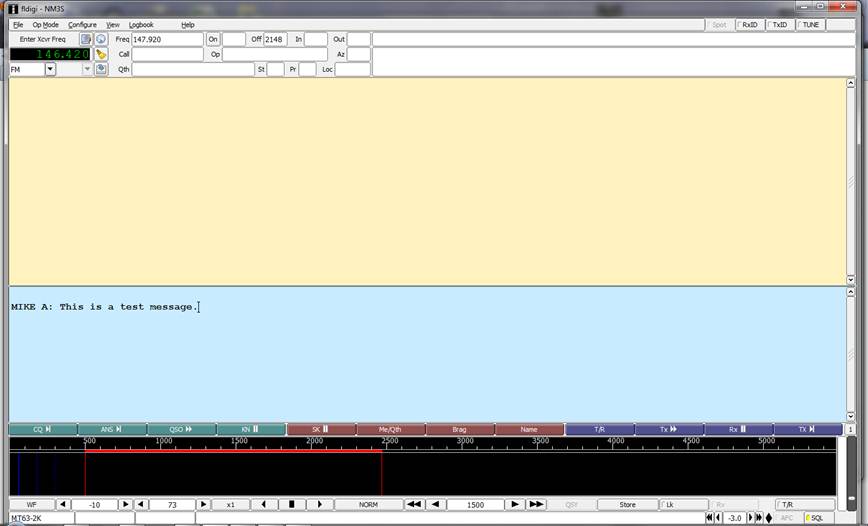
Now you
should be ready to send a test message.
Turn on your radio and set it to the appropriate frequency. For test messages, I suggest using a simplex
frequency and low power. In fldigi,
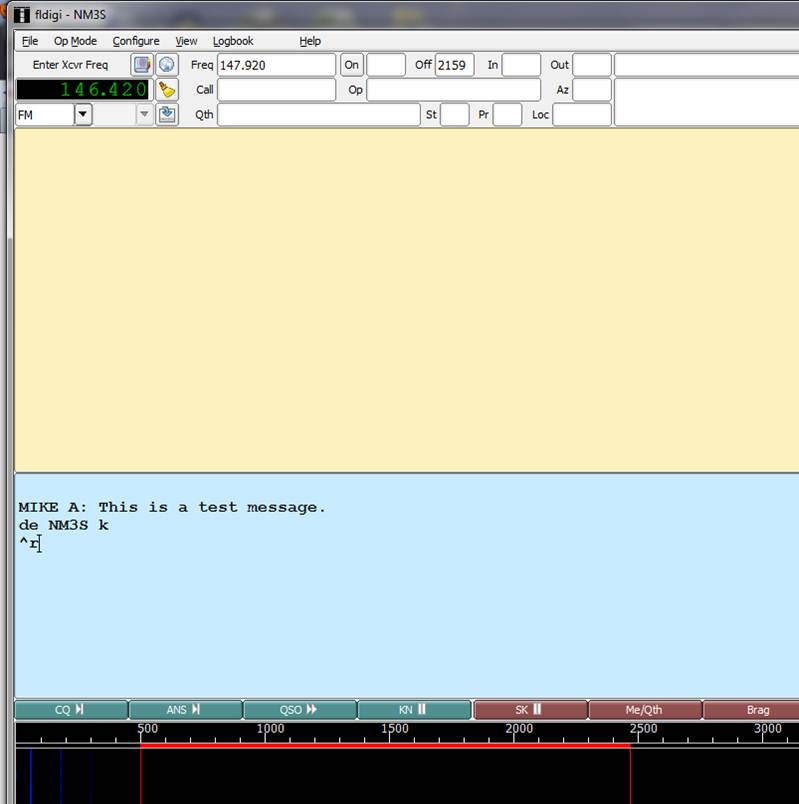
click the “Name” button you created before, then type your message. I typed “This is a test message”. Then, click the FAR RIGHT blue button to send
the message. This is the best “send”
button to use because it will send the text in the bottom window and then stop.
Step 3, click the “TX >|” button, on the far-right.
|
|
Step 2, Type your message here.
|
|


Step 1, click the “Name” button we created earlier.
|
|


Note what
happens when we hit the transmit button.
The first thing it does is to add some stuff. The “de” is digital (and CW) shorthand for
“from”, and it adds your call sign automatically, so all messages you send will
have your call sign – cool! It then adds a “k” which more shorthand and
essentially means “over”. The “^r”
won’t transmit and just tells fldigi to switch back to receive mode instead of
staying in transmit mode. If that wasn’t
there you’d have to stop transmission manually
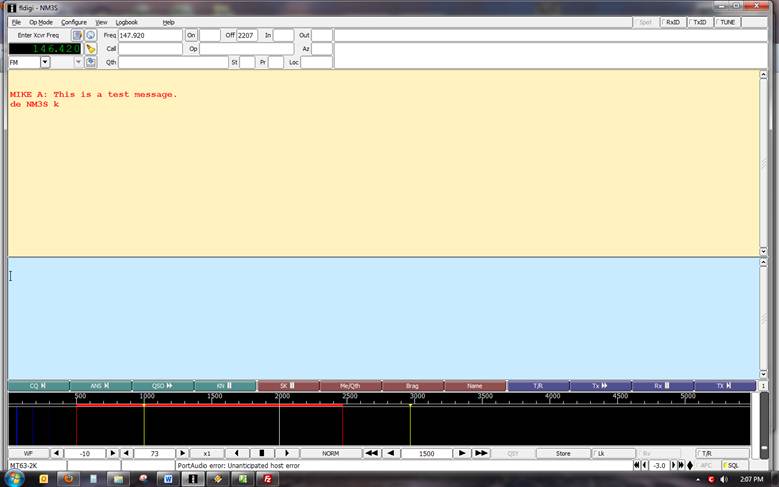
Below is a
picture something like the way your screen will appear after the test
transmission is sent, if everything went well.
Anything you receive will also appear in the top window. (That’s why we want to start each message
with a <return> key because it will make sure our message appears on a
new line on the recipient’s screen.) By
the way, if things go wonky and you want to STOP TRANSMISSION NOW, you can
click the T/R button in the lower right corner.
This button has a “red light” icon that appears when it is
transmitting. Clicking it will toggle
fldigi between transmit and receive mode.
That means, if you click it, just click it ONCE. It may take a few seconds to stop
transmitting, but it will.

If you want transmission to STOP NOW, click this button
ONCE.
|
|

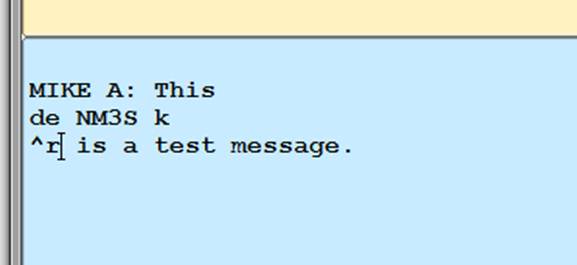
ONE LAST
IMPORTANT NOTE: before you click the “send” button, you MUST be sure the cursor
is at the END of your message. This is
where it normally will be if you just type the message, so it’s usually no
issue. However, if you make an error and
click back at the beginning or middle of your message to fix the problem, when
you are finished typing, you MUST click at the end of the message so the “de”, callsign and “k” will appear at the end of the
message. If you don’t, you’ll get a mess
on the screen like that shown below. And
it will stop transmitting after the ^r, so it won’t even send the whole message! Boy will I look dumb! To make this mess, I put the cursor right
after the word “this” and clicked the transmit button. Go ahead and try it while you’re testing, and
you’ll see what I mean. This is an easy
problem to avoid once you’re aware of it, just remember to always click at the
END of the message after you do any corrections and BEFORE you hit the transmit
button!
Your NBEMS
should now be set up and ready to use.